
🐞 Hello Lady Bug Bundle 🐞
🐞 For those that know me, know that I am a huge lover of Lady Bugs / Lady Beetles & I especially love the symbolism behind the ladybug 🐞. On an ethereal level. 🐞 Ladybugs are generally associated with Good Fortune and Good Luck.🐞 They also bring with them a sense of Future Prosperity. 🐞 Their bright and Colourful look, along with their happy-go-lucky travels means living life without boundaries, and that all things are possible.
Measurements & Instructions 🐞
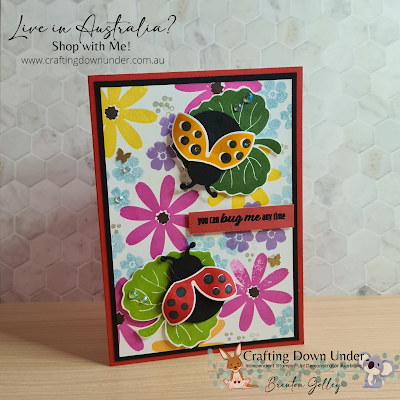
Card Base 21cm x 14.8cm scored @ 10.5cm
Inside Layer Basic White Cardstock 14.3cm x 10cm 🐞
Cardstock Layer #1 - Basic Black 14.3cm x 10cm
Cardstock Layer #2 Basic White 13.8cm x 9.5cm
- With Cardstock Layer #2 stamp a background with flowers in various colours, you can choose your own if you like! I used Memento Black, Mango Melody, Daffodil Delight, Magenta Madness, Highland Heather, Balmy Blue & Sahara Sand. 🐞
- Stamp out leaf in 2 green colours, I sued Granny Apple green and Garden Green and then fussy cut both leaves out.
- With Lady Bug Builder Punch, punch out x2 Black Lady Bug Bodies, using Basic Black Cardstock.🐞
- On Scrap basic white cardstock Stamp Wings in 1x Poppy Parade and 1x Magenta Madness and then using the Lady Bug Builder Punch, punch out both wings.
- On a strip of Poppy parade cardstock stamp out sentiment in Versamark and emboss with black embossing powder. OR if you don't have the embossing powder just stamp sentiment in memento Back ink.
- Using Dimensionals apply 2 to the widest part of the leaf and then multipurpose glue to the tip and place on the stamped cardstock, to give dimension. do the same with the second leaf. Or whatever you wish to do. 🐞
- Using glue dots, place 3 along the underside top of the wings to attach to the neck of the Body. you can use your bone folder to slightly curl the wings for added interest and shape.
- With Dimensionals stick to the underside of the lady bug bodies and stick to the top of each leaf.🐞
- Cut down you sentiment to a size you find appealing and with dimensionals stick to the underside of the sentiment and place on top of the card front. Then with multi purpose glue adhere to the Black cardstock layer and then glue that tot he card base. Adhere the basic white inside layer tot he card and stamp a sentiment if you wish.
- Add some embellishments, Brushed Brass Butterflies & Iridescent Rhinestones and the Card is Complete. 🐞


🐞Stampin’ Up! Products
If you Don't already have a Stampin' Up! Demonstrator I would love to have you as a customer. You can purchase any of the Stampin Up card making and paper craft products I use from Crafting Down Under, available to residents in Australia Only via my online shop by clicking the images below or contacting me direct via email or phone.🐞
It means a lot to me to have your continued support. So if you do decide to shop with me please use my current February HOST CODE WDWNK69S for all orders up to $250. All orders that use this code will receive a little extra thank you from me next month.
If you place an order for $250 and above, please don't use the host code, you can get the rewards for yourself. But if you do spend that much, please think about joining Stampin Up and My team 'Down Under Crafters', as you'll end up saving more for your future product purchases. 🐞
🐞 More info can be found on the JOIN MY TEAM tab.
Stampin’ Up! Products Used 🐞
Product List
") |  |  |  |  |
 |  |  |  |  |
 |  |  |  | |
 |  |  |  | |
 |  |  |


Thankyou so much for taking the time to visit my website, I hope you like my Card and enjoy re-creating it.🐞
Until Next Time ,
HooRoo! 👋🏻🐞
Comments
Post a Comment